Menu
Documentation relevant to all 4.8.x releases – Category Posts Widget
Other documentations: 4.1.x, 4.6.x, 4.7.x
(The minor x version number means patch versions)
Note: If you have any question about how to configure the widget for which you can not find an answer on this page, please ask on the WordPress.org support forum. As it is easy to see, we do monitor and answer questions there.
Widget
“Category Posts Widget”
Server Requirements
- PHP version 5.3+ and higher
- WordPress version 4.0 and above
General features
The plugin lets you insert a list of “recent posts” published on a specific category, either as a sidebar widget or in the content with the use of a shortcode.
“Recent posts” is a misleading term here, as you can use several types of criteria to decide which posts will be displayed and chronological order is just one of the options.
You can control many aspects of how each post item will be displayed. The size and placement of a thumbnail, whether to show excerpt, author, comments number, date information and more.
Shortcode
By using the [catposts name="xxxx"] shortcode you can insert a unique widget into any place in a content. The shortcode has the same functionality and configuration options as a “normal” widget.
The “name” parameter is optional if you have only one shortcode in the content, but should be specified if you have more than one shortcode. It is used to identify the shortcode both internally and in the customizer.
Inserting removing and configuring a shortcode
The shortcode [catposts name="xxxx"] can be inserted in any type of content, anywhere. It is basically used to indicated where the widget will be displayed in the content. There can be only one shortcode per post/content, with the same “name”, unless you intentionally want to display the exact same thing in different location. Remove it by deleting the shortcode from the content. Changing the “name” is equivalent to removing the original one and creating a new one.
Once the shortcode is in the content you need to get to the customizer for the post. The easiest way to do that is to go into preview from the post editing screen and click the “Customize” menu on the “admin bar”. In the costumizer you will find the “Category Posts Shortcode” Section and entering it will show you a list of subsections which lead to a form with which you can configure the display of the shortcode. Each subsection is labeled by the value of the “name” attribute, while if no name was giver the label will be “[shortcode]”
There is an helper button added to the editor to help with the insertion

And clicking on it will open the next window
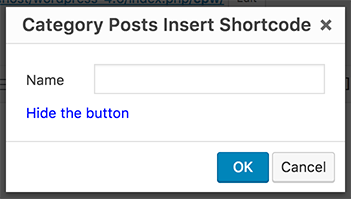
In which you can insert the “name” attribute, but it is not mandatory.
Administration
When used as a sidebar widget, it is possible to add, remove and configure the widget either through the widget admin page, or via the customizer. When used as a shortcode you can insert the shortcode into any type of content, and then go to the customizer to configure what the short code displays.
In both cases the configuration form looks and behaves the same
There are many aspects to the widget you can control including which posts will be displayed in it and some styling to the way they are displayed.
Since there are many options to control, in order to ease keep the admin area in a reasonable height we have divided the options into “panels” in which related options are being grouped together. You can open (expose the options) and close (hide them) by clicking the title of the panel.
Except for the visual effects, changing the options behaves exactly like it behaves in any other wordpress widget, both in the widgets admin screen and in the costumizer.
Some of the behaviour of the admin part itself can be customized in the user profile, Read more about it
Title

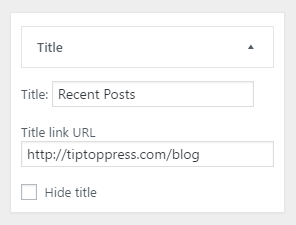
Here you can find options to control what is displayed above the widget, AKA as its title. You can either not display a title at all, display some simple text, or display a link to the relevant category page.
The specific options are
- Title: The text that is being displayed as the title
- Make widget title link: (This check box appears, if in the Filter panel only one specific category is selected.) If selected the title will become a link to the relevant category page
- Title link URL: (This text box appears, if in the Filter panel ‘All categories’ is selected.) To generate a link you have to put a valide URL in this text box.
- Hide title: If selected no title will be displayed, no matter what the other options are.
Note: How to combine categories in one link you can be read here
Filter

Here you can control which posts will be displayed in the widget. You can control their number, their “freshness” and the sort criteria by which they are selected and displayed.
The options are:
- Category: The category to which the posts have to be associated with. The special value of “All categories” indicates that all posts should be displayed, no matter which category they are associated with”.
- Status: Select post with by post status. By default WordPress will not display a future timestamped post until its go-live date rolls around. With the selected option “scheduled” posts will be displayed even if its timestamp is in the future. Other options are “published” and “private”.
- Number of posts to show: The number of posts that will be displayed in the widget.
- Start with post: A numeric that can be used to indicated that the widget will not display the post that are the “highest” results of the sorts criteria, but at some offset from the “first” result. A value of 1 indicates that the “first” item should be displayed and then the items “after” it. A value of 2 indicates that the “second” value should be displayed and then the items “after” it, etc.
This is useful if you want to have two “latest news” widgets that display the recent post where one displays the N “latest” ones in a different way than the rest. - Sort By: The sort criteria used to select which posts out of all the posts associated with the category are actually going to be displayed. It also controls the display order.
Sort options are:- Date: Posts are sorted by their publish time. When selected The posts will be displayed from latest to oldest
- Title: Post are sorted alphabetically by their title
- Number of Comments: Post are sorted by the number of comment they have. The posts with more comment are displayed first
- Random: No sort at all, posts are randomly picked to be displayed on every new page load.
- Reverse sort order (ascending):If selected, the sort order specified in “Sort By” is reversed, “date” sort will show oldest posts first, “Title“ will show lower alphabetical titles first and “Number of comments” will show the posts with the least number of comments first.
- Exclude current post: If selected, when the widget is displayed on a post which matches all other criteria, the post itself will not be displayed as part of the widget. This behavior is useful if you use the widget to direct users to other posts, and displaying a link to the post the user is already on, is a waste of space.
- Exclude posts which have no thumbnail: If selected, posts without a thumbnail/featured image will not be displayed. This is useful if you enable the display of thumbnails, and want to avoid style mismatches where some posts are displayed with and some without thumbnails. This is really just a stop gap measure, and it is much better to make sure all relevant posts have featured image.
Post details
Template
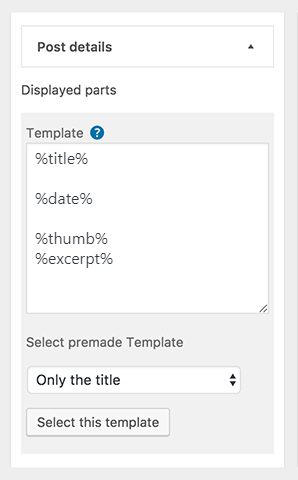
Here You can control the post detail parts, which appears as part of the post item. All post detail will placed as placeholder. The text in the Template area can be a post details placeholder, text, HTML or HTML for SVG icons.
Note: For the SVG-icon HTML we recommend the WordPress Dashicons, which are included as default and can be used without any icon-font including.
Placeholders:
| New line | Space |
|---|---|
| Empty line | Next line is a paragraph |
| %title% | Post title |
| %thumb% | Post thumbnail possibly wrapped by text |
| %date% | Post publish date |
| %excerpt% | Post excerpt |
| %author% | Post author |
| %commentnum% | The number of comments to the post |
| %post_tag% | Post tags |
| %category% | Post categories |
Note: How it works? and Examples.
- Select this template: Here we give premade example Templates. Choose one and select it with the button below to take it over.
- Everything is a link: Each post item, including all its components, is a link to the post.
Excerpt settings

- Show post excerpt: When selected, the post excerpt will be displayed
- Excerpt length (in words): If the excerpt is displayed, this can be used to control the number of words in the excerpt. If the excerpt have more words in it then the specified limit, a “read more” kind of text will be added to the end of it
- Excerpt ‘more’ text: The text to be used with the “read more” text being displayed when the excerpt limit is smaller then the excerpt size
- Themes and plugins may override: If set, themes and plugins are “allowed” to make modifications which might result in different excerpt than what is defined by the settings of the widget.
Date format settings

The options are:
- Date format: Select the format in which the date will be shown. “Date since published” is the range from post publish date till now. The others are kinds of formats for the date.
- PHP Sytel Date format: The format of the date maybe any combination described on this page
Thumbnails settings

Here you can control how thumbnails are being displayed
Options are:
- Show post thumbnail: If selected a thumbnail based on the featured image of the post will be displayed.
- Show thumbnails above text: If selected the thumbnail will be displayed above the text describing the post, if not selected it will be display to the left of it (on right to left sites, on the right).
- Thumbnail dimensions (in pixels): You should set here The dimension of the thumbnail in pixels. It is best to set both dimensions but if you set only one the system will try to figure out the other.
- Animation on mouse hover: Set visual effect to happen when the user is hovering a thumbnail. The possible effect are:
- Darker: The thumbnail image will get a darker tone to it.
- Brighter: The thumbnail image will get a brighter tone to it.
- Zoom In: The thumbnail image will be zoomed into.
- Blur: The thumbnail image will be blured.
- Icon: An icon is shown for the default post format.
- Indicate post format and position: Is a post assigned to a different post format as the default forat, it is indicated with a icon and can be placed at different positions. The “Html without styling” option can be used, if a used Theme has own styles and hasn’t be overridden.
- Default thumbnail: Select an image to be used as the thumbnail if no thumbnail is configured for the post. The selection process utilizes the internal media library which means that you can either select an already uploaded images or upload a new one.
General
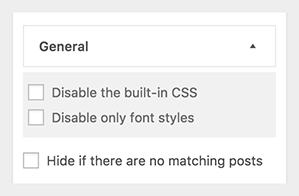
Here you can set some miscellaneous options
Options are:
- Disable the built-in CSS for this widget: If selected no CSS will be added automatically to style the specific widget. Any styling will have to be done by adding your own CSS rules.
- Disable only fonts styles for this widget: (This check box appears, if not ‘Disable the built-in CSS for this widget is checked.’) If selected any style rules for fonts wouldn’t be added by the widget.
- Hide widget if there are no matching posts: If selected, when there are no posts in the category (or none have thumbnail, if the hide posts without thumbnail option is selected), The widget will not be displayed at all, which in practical terms means that the title and footer will not show.


Here you can set how the footer of the widget looks
Options are:
- Footer link text: (Only this text box appears, if in the Filter panel > only one specific category is selected.) If not empty a link to the relevant category page will be displayed in the footer, with the text being used as the anchor text of the link.
- Footer link URL: (This text box appears, if in the Filter panel > ‘All categories’ is selected.) To generate a link you have to put a valide URL in this text box.
Note: How to combine categories in one link you can be read here
Administration behaviour configuration in the user profile
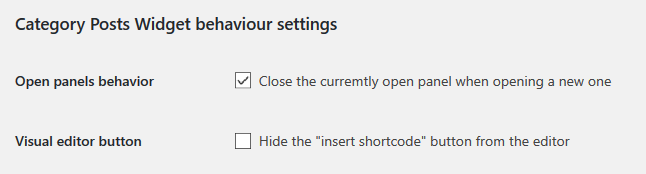
In the user profile, the user can change the behaviour of the admin for himself
- Open panels behaviour: When selected, only the “current” panel in the widget admin is displayed, and when a new one is being opened to be displayed the “current” is being hidden.
When not set, the user has explicitly “close” panels. - Visual editor button: When selected, the shortcode insertion button in the editor will not be displayed.
Did not find what you were looking for? please ask on the wordpress.org support forums form the plugin. As it is easy to see, we do monitor and answer questions there.